
昨日我們介紹了 Thymeleaf 樣板引擎,並已經完成 Template 環境建置與初始頁面,接下來我們嘗試利用樣板引擎來製作一個待辦清單 TodoList,我們直接進入實際實作步驟與介紹:
設定環境設定
application.yml1
2
3
4
5
6
7
8
9
10
11
12
13
14
15
16
17
18
19
20
21spring:
h2: # 設定 H2 資料庫相關配置
console:
enabled: true
path: /h2-console
datasource: # 設定資料庫相關配置
url: jdbc:h2:file:./src/main/resources/data/ironman;AUTO_SERVER=true
username: sa
password: Ironman0924!
jpa: # 設定 JPA 相關配置
hibernate:
ddl-auto: update
database-platform: H2
show-sql: true
generate-ddl: false
thymeleaf:
cache: false # 關閉 Cache
encoding: UTF-8 # 編碼設定
mode: HTML5 # 模式
suffix: .html # 檔案副檔名
prefix: classpath:/templates/ # 檔案儲存位置建立 Todo
Entity,映射 Todo 資料表與欄位,此部份我們將 id 改為 UUID 來進行自動編號,並且利用資料庫自動新增資料建立時間 createTime 與資料修改時間 updateTime1
2
3
4
5
6
7
8
9
10
11
12
13
14
15
16
17
18
data class Todo(
val id: UUID = UUID.randomUUID(),
val task: String = "",
var status: Int = 0,
val createTime: Date = Date(),
val updateTime: Date = Date()
)建立
Todo DAO,建立DAO物件處理資料庫溝通1
2
3
4
5
6
7interface TodoDao : JpaRepository<Todo, Long>, JpaSpecificationExecutor<Todo> {
/**
* 查詢符合 Id 條件的資料
*/
fun findById(id: UUID): Todo?
}建立 Service Interface-
TodoService,預計會使用四種動作(取得資料、建立資料、更新狀態、刪除資料)1
2
3
4
5
6
7
8
9
10
11
12
13
14
15
16
17
18
19
20
21
22interface TodoService {
/**
* 取得所有 Todo 資料
*/
fun getTodos(): Iterable<Todo>
/**
* 建立 Todo 資料
*/
fun createTodo(todo: Todo): Todo
/**
* 更新 Todo 狀態
*/
fun updateTodoStatus(id: String): Boolean
/**
* 刪除 Todo 資料
*/
fun deleteTodo(id: String): Boolean
}實作 Service -
TodoServiceImpl1
2
3
4
5
6
7
8
9
10
11
12
13
14
15
16
17
18
19
20
21
22
23
24
25
26
27
class TodoServiceImpl( val todoDao: TodoDao) : TodoService {
override fun getTodos(): Iterable<Todo> = todoDao.findAll()
override fun createTodo(todo: Todo): Todo = todoDao.save(todo)
override fun updateTodoStatus(id: String): Boolean = todoDao.findById(UUID.fromString(id)).run {
return try {
this?.let {
if (it.status == 1) it.status = 0 else it.status = 1
todoDao.save(it)
}
true
} catch (exception: Exception) {
false
}
}
override fun deleteTodo(id: String): Boolean = todoDao.findById(UUID.fromString(id)).run {
return try {
this?.let { todoDao.delete(it) }
true
} catch (exception: Exception) {
false
}
}
}建立 Controller Interface -
HomeController,建立資料(createTodo)會使用到 @ModelAttribute Annotation接收來自前端表單資料,而修改狀態資料(updateTodoStatus)與刪除資料(deleteTodo)則預計利用呼叫 API 方式進行動作,故須加上 @ResponseBody 標註:1
2
3
4
5
6
7
8
9
10
11
12
13
14
15
16interface HomeController {
fun getTodos(model: Model) : String
fun createTodo( todo: Todo) : String
fun updateTodoStatus( id: String)
fun deleteTodo( id: String)
}實作 Controller,建立資料(createTodo)完成後要記得轉向取得資料頁面,會使用到
redirect轉向方法1
2
3
4
5
6
7
8
9
10
11
12
13
14
15
16
17
18
19
20
21
22
23
class HomeControllerImpl( val todoService: TodoService): HomeController {
override fun getTodos(model: Model): String {
model.addAttribute("todolist", todoService.getTodos());
model.addAttribute("todoObject", Todo())
return "home"
}
override fun createTodo(todo: Todo): String {
todoService.createTodo(todo)
return "redirect:/todos"
}
override fun updateTodoStatus(id: String) {
todoService.updateTodoStatus(id)
}
override fun deleteTodo(id: String) {
todoService.deleteTodo(id)
}
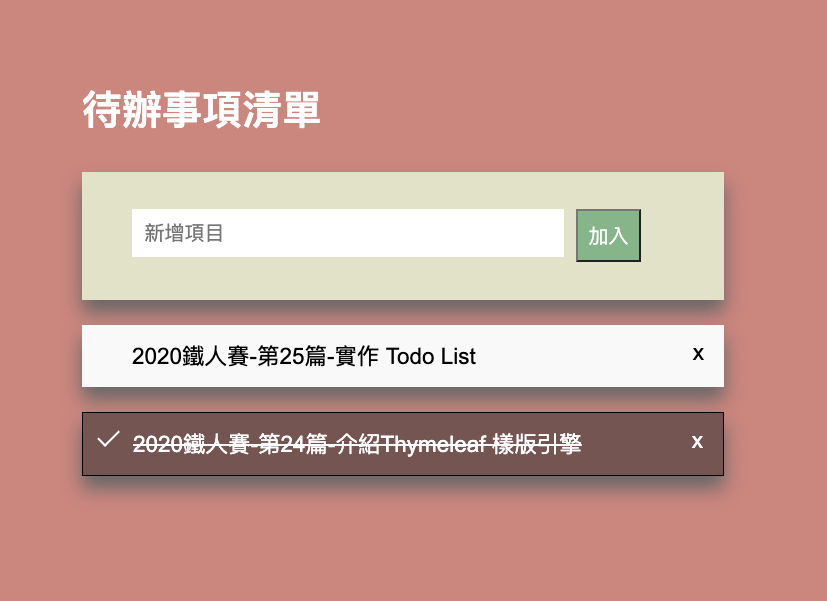
}在 resource / templates 資料夾建立 home.html
1
2
3
4
5
6
7
8
9
10
11
12
13
14
15
16
17
18
19
20
21
22
23
24
25
26
27
28
29
30
31
32
33
34
35
36
37
38
39
40
41
42
43
44
45
46
<html lang="en" xmlns:th="http://www.thymeleaf.org">
<head>
<meta charset="UTF-8">
<link rel="stylesheet" th:href="@{/style.css}">
<link href="https://fonts.googleapis.com/css2?family=Roboto:wght@400;500;700&display=swap" rel="stylesheet">
<title>Todo List</title>
</head>
<body>
<div class="container">
<h2>待辦事項清單</h2>
<form class="inputBox" th:action="@{/todos}" method="post" th:object="${todoObject}">
<input type="text" id="input" placeholder="新增項目" th:field="*{task}">
<button type="submit" class="submit">加入</button>
</form>
<ul th:each="todo: ${todolist}">
<li th:class="${todo.status} == 1 ? 'checked': '' " th:onclick="updateTodoStatus([[${todo.id}]])">
<span th:text="${todo.task}"></span>
<span class="close" th:onclick="deleteTodo([[${todo.id}]])">x</span>
</li>
</ul>
</div>
<script>
const deleteTodo = (id) => {
fetch('todos/'+ id, {
method: 'delete',
}).then((response) => {
if (response.status === 200) {
location.reload();
}
})
};
const updateTodoStatus = (id) => {
fetch('todos/' + id, {
method: 'put',
}).then((response) => {
if (response.status === 200) {
location.reload();
}
})
};
</script>
</body>
</html>在 resource / static 建立 style.css
1
2
3
4
5
6
7
8
9
10
11
12
13
14
15
16
17
18
19
20
21
22
23
24
25
26
27
28
29
30
31
32
33
34
35
36
37
38
39
40
41
42
43
44
45
46
47
48
49
50
51
52
53
54
55
56
57
58
59
60
61
62
63
64
65
66
67
68
69
70
71
72
73
74
75
76
77
78
79
80
81
82
83
84
85
86
87
88
89
90
91
92
93
94
95
96
97
98
99
100
101
102
103
104
105
106
107
108
109
110
111
112
113
114
115
116
117
118
119
120body{
background-color: #d5827b;
font-family: arial,
"Microsoft JhengHei","微軟正黑體",
sans-serif ;
}
body h2{
color: white;
}
.container {
width: 50%;
margin: 10% auto;
}
ul {
padding: 0px;
}
ul li {
cursor: pointer;
position: relative;
padding: 12px 8px 12px 40px;
background: #eee;
font-size: 18px;
transition: 0.2s;
box-shadow: 0px 10px 15px #666;
-webkit-user-select: none;
-moz-user-select: none;
-ms-user-select: none;
user-select: none;
list-style: none;
}
ul li:nth-child(odd) {
background: #f9f9f9;
}
ul li:hover {
background: #ddd;
}
h2 {
font-size: 32px;
font-weight: 700;
}
ul li.checked {
background: #7a534f;
color: #fff;
text-decoration: line-through;
border: 0.5px solid black;
}
ul li.checked::before {
content: '';
position: absolute;
border-color: #fff;
border-style: solid;
border-width: 0 2px 2px 0;
top: 10px;
left: 16px;
transform: rotate(45deg);
height: 15px;
width: 7px;
}
.close {
position: absolute;
right: 0;
top: 0;
padding: 12px 16px 12px 16px;
}
.close:hover {
background-color: #f44336;
color: white;
}
.inputBox {
background-color: #e0e2c6;
padding: 30px 40px;
color: #5C4319;
text-align: center;
box-shadow: 0px 10px 15px #666;
}
.inputBox:after {
content: "";
display: table;
clear: both;
}
input {
margin: 0;
border: none;
border-radius: 0;
width: 75%;
padding: 10px;
float: left;
font-size: 16px;
}
.submit {
padding: 8px;
background: #79b786;
color: #fbfffd;;
float: left;
text-align: center;
font-size: 16px;
cursor: pointer;
transition: 0.3s;
border-radius: 0;
margin-left: 10px;
}
.submit:hover {
background-color: #bbb;
}最後執行專案,即可看到 Todo List:
此文章有提供範例程式碼在 Github 供大家參考